配管業者の店長が実際に使っている厳選の排水用洗浄剤 | ビーエヌクリーンかパイパスで詰まりを改善できます
|
|
|
|
|
|
|
|
|
ショッピングカート
カートの中身
カートは空です。
カートに商品が入りません
お客様情報のログイン
-
排水の不調・詰まりの基礎知識 - 基礎知識【原因と対処のしかた】
- 基礎知識【予防のしかた】
- ◆トイレのつまり
- ■台所・お風呂・洗面台に適しているパイプクリーナーとは?
- ■年月がたって固くなった油汚れを除去する方法・予防する方法
- ●一度ためしてください!液体パイプクリーナーのおすすめの使い方
- ■液体パイプクリーナーでは固くなった油汚れを除去できない理由
- ■ドラッグストアなどで買える液体パイプクリーナーについて
- ■家庭向けの液体パイプクリーナーの成分について
- ■苛性ソーダ系のパイプクリーナーはどれなのかを判断する方法
- ★化学薬品系のパイプクリーナーの種類・メリット・デメリット
- ★家庭用の種類、家庭用と業務用パイプクリーナーの違い
- ■ワイヤーブラシを買おう・使ってみようと考え中の人へ
- ■業者にワイヤー清掃でなく高圧洗浄をすすめられたときの考え方
- ★ビーエヌクリーンが作用する様子
- ★苛性ソーダ系パイプクリーナーが作用する様子
- ★BN菌と苛性ソーダ系パイプクリーナーの作用の違い
-
台所の流し台・シンクの問題 - ■キッチンの流し台・シンクの排水の不調の原因と対処【基礎知識】
- ■台所の流し台の排水の流れが悪い主な理由
- ●液体パイプクリーナーを使ったけど流れがよくならなかった理由
- ●一度ためしてください!液体パイプクリーナーのおすすめの使い方
- ■排水の流れが悪くなった場合の主な対処法
- ■排水の流れが急に悪くなった場合の対処について
- ■排水のひどさの程度を液体パイプクリーナーで判断する方法
- ■台所の排水の対処【がたっても、たまった排水が全然減らない】
- ■台所の排水の対処【少しでも排水が流れる場合】
- ◆シンク・流し台の排水口の構造
- ◆厨房・台所のつまり 原因と対処
- 症状① 排水が完全に流れなくなった
- 症状② 排水がたまって少しずつ流れていく
- 症状③ 排水の流れが悪い・遅い
- 症状④ 排水が流れるときにボコボコ音がする
- 症状⑤ 排水溝から悪臭・異臭がする
-
ユニットバス・お風呂の問題 - ユニットバス・風呂の排水の不調の原因と対処【基礎知識】
- ユニットバスの詰まりの原因
- ユニットバスの排水の流れが悪くなった仕組み
- ユニットバスの排水口・排水トラップの構造
- 洗い場の排水口から排水が逆流してくる理由
- ユニットバスの排水の流れが遅い・悪い理由
- ●液体パイプクリーナーを使ったけど流れがよくならなかった理由
- ●一度ためしてください!液体パイプクリーナーのおすすめの使い方
-
洗面台の問題 - ◆洗面台の排水の不調の原因と対処【基礎知識】
- ◆ 洗面台の排水の構造
-
厨房の排水の問題 - ② 油脂汚れで詰まりやすくなった排水環境
- ③ 詰まってしまった場合の様子
- ④ 詰まってからワイヤー式ドレンクリーナーを使う対処
- ⑤ 業務用パイプクリーナーを定期的に使っている排水は…
- ◆シンク・流し台の排水口の構造
- ◆厨房・台所のつまり 原因と対処
- 排水ホースを差し込んである所から排水があふれたり悪臭がする
- 【余計なお世話的・リスク説明】
ホテル・食堂の経営の方へ - 【余計なお世話的・リスク説明】
厨房で調理をしている方へ - 【余計なお世話的・リスク説明】
喫茶店のオーナー・店長の方へ -
業者(私)の自宅ならこう対処 - その1 台所の流し台の流れが悪い
- その2 ユニットバスの洗い場や浴槽の流れが悪い
- 業者の私が業務用パイプクリーナーのパイパスを使う理由
-
ビーエヌクリーン Q&A - ★ビーエヌクリーンの欠点
- ※ビーエヌクリーンを過量で使いすぎると、逆に詰まってしまう理由
- ① 一般的なパイプクリーナーとビーエヌクリーンとの違いは?
- ② ビーエヌクリーンの使用量、使用頻度はどれくらい?
- ③ ビーエヌクリーンを投入してから放置するはどれくらい?
- ④ 不調が改善したらビーエヌクリーンの定期使用はやめていい?
- ⑤ ビーエヌクリーンの使い方は簡単なの?
-
お客様から頂いた感想や意見 - ビーエヌクリーンのご感想
- パイパスのご感想
-
お客様から頂いたご質問 - 排水の清掃に試薬の苛性ソーダを使ってもいいんですか?
- プラスチックに影響はない?塩ビの排水パイプに使えるの?
- 強力な業務用を素人が使うのに不安があるのですが・・・
- 高圧洗浄しても1年程度でまた詰まるんですが・・・
- お風呂の排水溝のペットの毛にはパイパスがいいの?
- 「ほっといて」と「ビーエヌクリーン」は成分が違うの?
- ウチは浄化槽ですが、パイパスを使用しても大丈夫?
- 3日間水を流さない場合、ビーエヌクリーンを使った方がいい?
- 洋式水洗トイレの悪臭の原因について
- お風呂にパイパスを使う頻度は何日ごとが目安でしょうか?

|
ホーム |
Ever Alert installation instructions
|
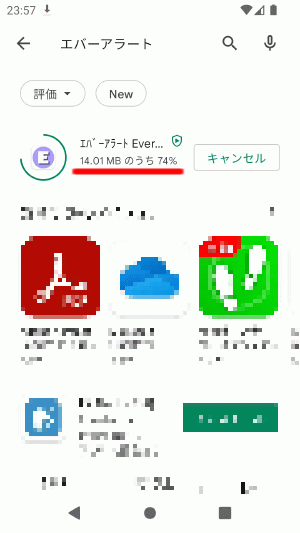
From how to install the app to how to activate the app, we will explain in an easy-to-understand manner with images. Below each image is a description. When step 5 is completed, the flashing function will be activated.
*Install the app while your smartphone can use the internet.
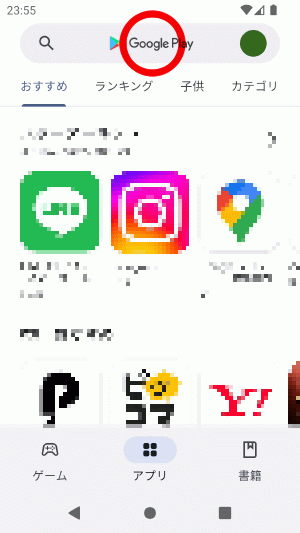
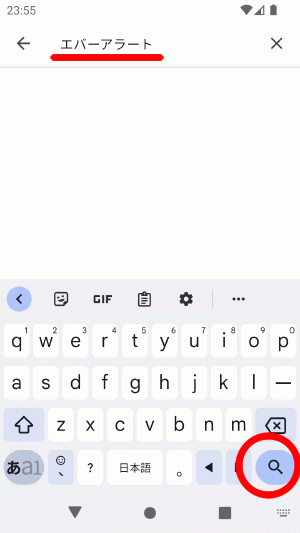
Below, If you don't use "Get it on Google Play" or "QR Code" How to install is explained.
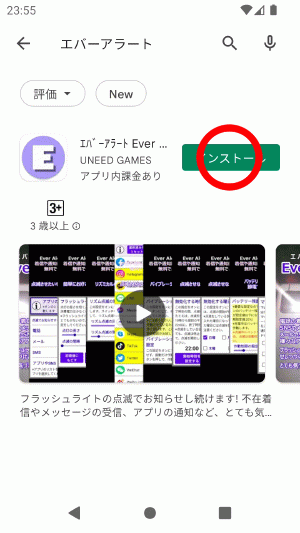
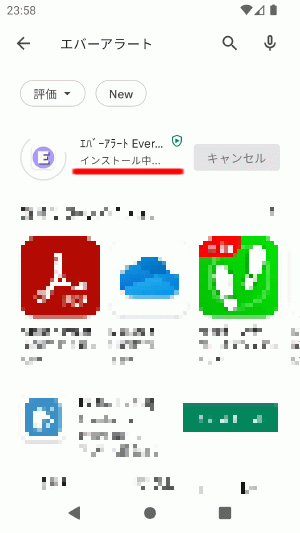
Tap the red circle.
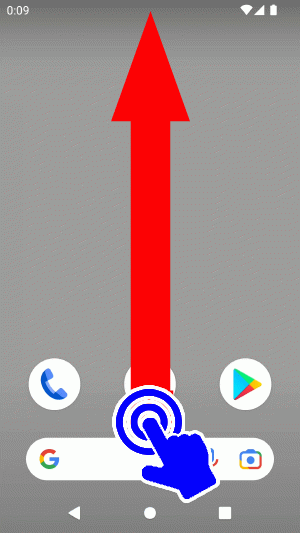
Tap the home button, etc.to return to the home screen. This completes "Step 1 Install the app". Please proceed to step 2.
Now that the installation is complete, launch the EverAlert app.
When the installation of the app is complete, the "Ever Alert" icon may be automatically added to the home screen. * Depending on the Android version, the icon may or may not be automatically added to the home screen. If the application can be started, "Step 2 Start the application" is completed. Go to step 3.
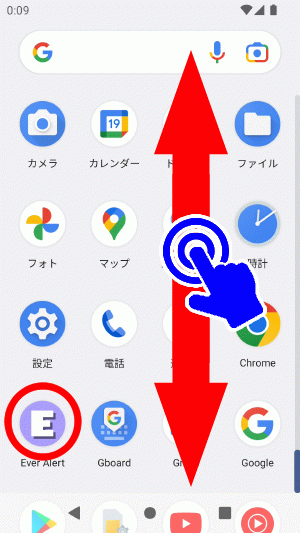
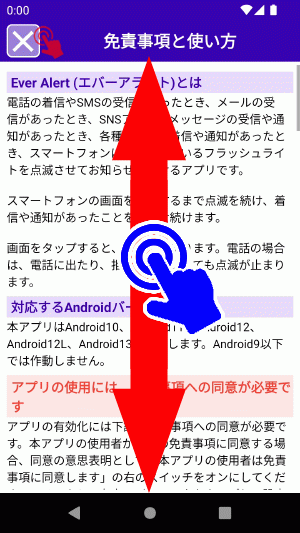
What is "swipe"? [Touch the screen with your finger and slide your finger while touching the screen] This is the operation of the screen called .
Swipe up or down on this screen. You will find the "Ever Alert" icon. Tap the Ever Alert icon that you find.The app will launch. If the application can be started, "Step 2 Start the application" is completed.Please proceed to step 3.
This completes "Step 2 Start the app". Go to step 3.
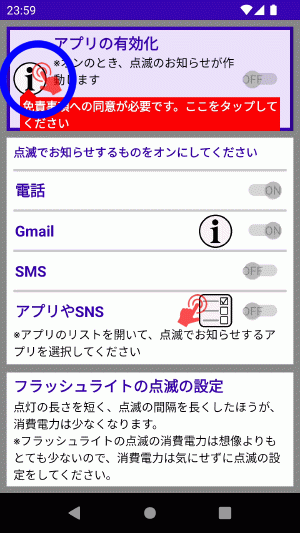
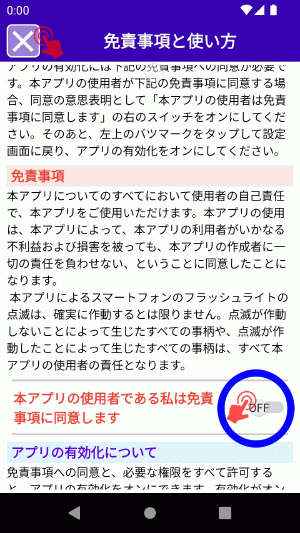
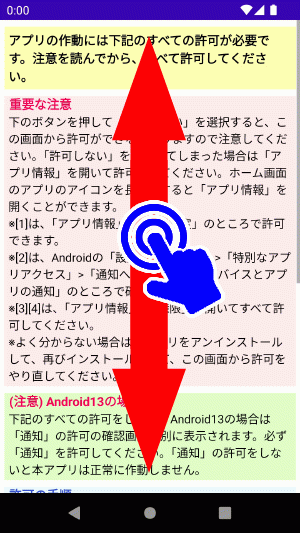
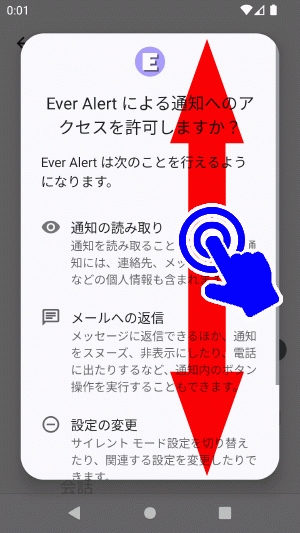
After launching the app, do "Accept Disclaimer" and "Allow Features" in the initial settings.
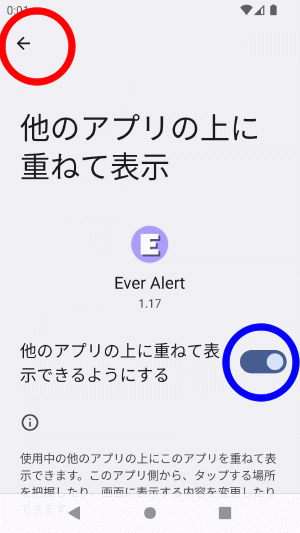
This is the main screen of the app. When the main screen appears, Tap the blue circle at the top left.
Tap the red circle at the top left to return to the main screen.
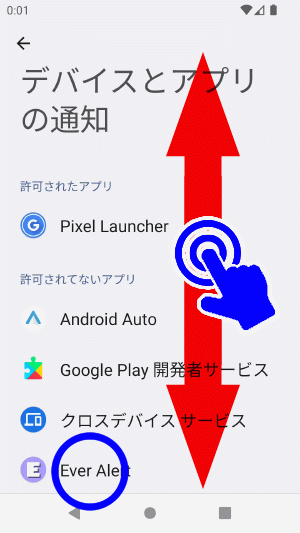
Swipe up or down on this screen.
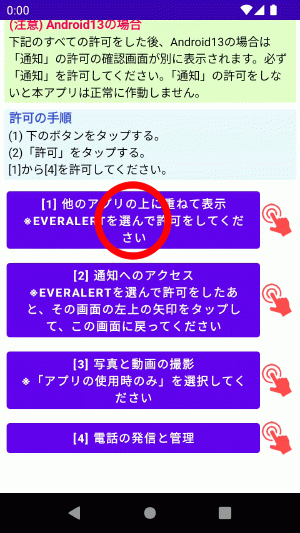
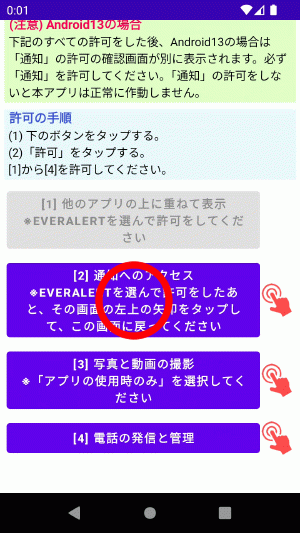
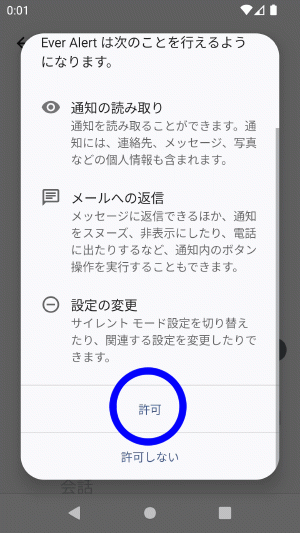
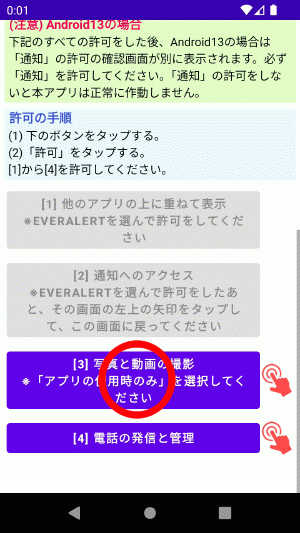
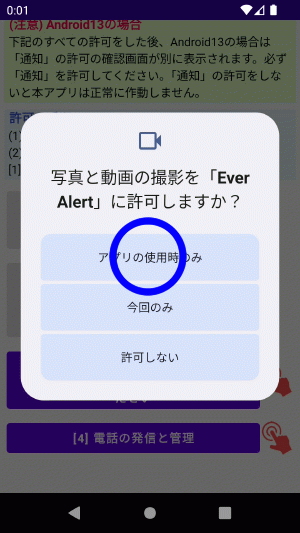
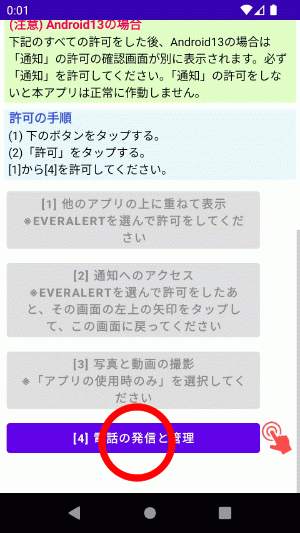
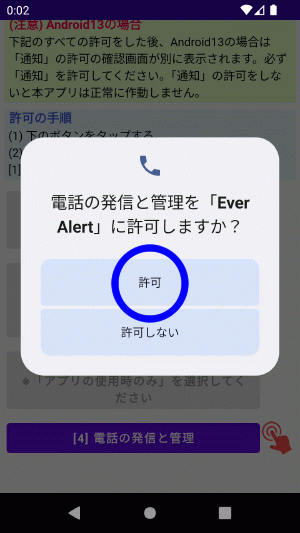
Tap [1] button red circle .
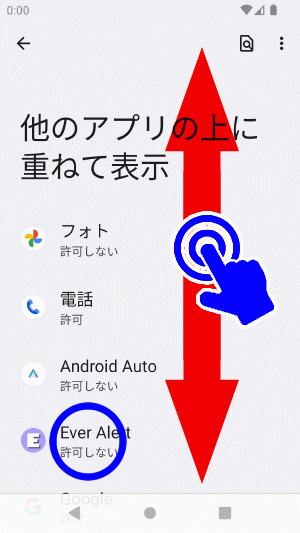
Swipe up/down to find Ever Alert. Once you find "Ever Alert", Tap "Ever Alert".
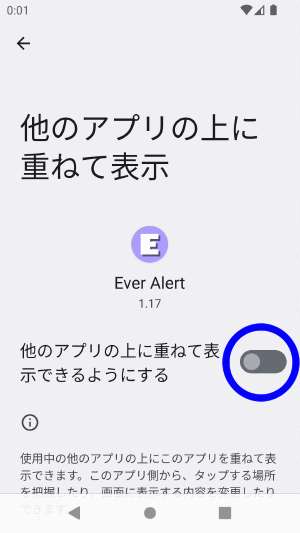
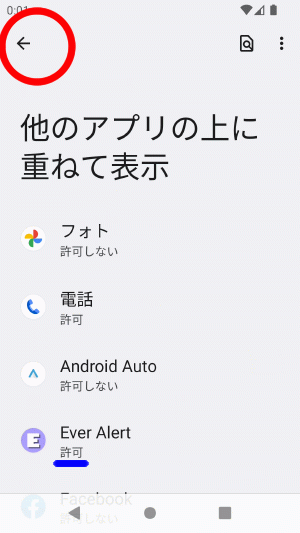
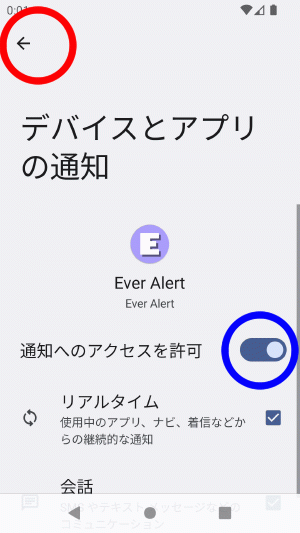
When the blue circle changes, Tap the top left arrow .
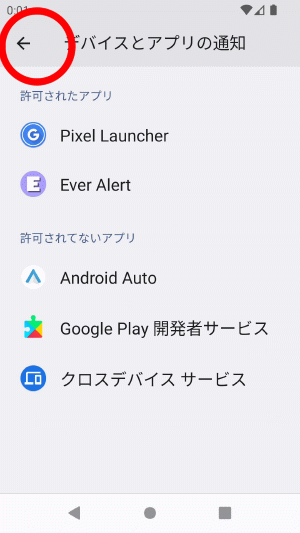
Tap the top left arrow .Go back to the 4 button screen.
Swipe up or down until you find Ever Alert , then tap on Ever Alert . * For Android12 , Android11 , and Android10 , the above screen will not be displayed, so please proceed to the explanation below.
* On Android 12 , Android 11 and Android 10, it will be displayed as "Access to Notifications" . Tap the blue circle to the right of "Allow access to notifications" .
* Android12 , Android11 , Android10 have a slightly different display, but they have the same "Allow" display.
[1] to [4] is completed, it will automatically return to the main screen. This is the end of "Step 3 Initial settings for the app".Please proceed to step 4.
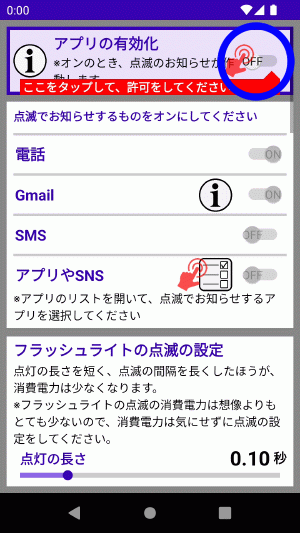
Now that the initial setup is complete, you can test the blinking operation. Now check to see if the smartphone's flashlight works. If the flashlight shines in this operation test, there is no problem.
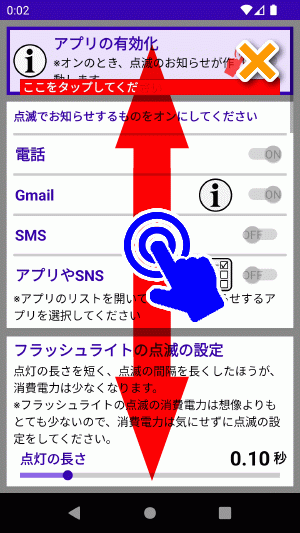
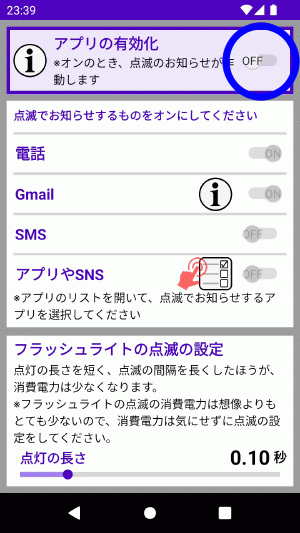
Test the flashlight operation before proceeding to step 5. Swipe up or down a bit to get to Flashlight Blink Settings .
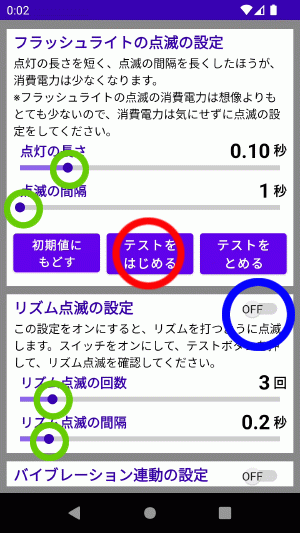
The smartphone's flashlight blinks repeatedly. Tap the "Stop Test" button to stop blinking. *Blinking stops automatically when the smartphone is turned sideways during the operation test. Next, tap blue circle to turn it ON . When the blue circle turns on, tap the "Start Test" button .The blinking method changes.Tap the blue circle again to OFF to return to simple blinking. Swipe left or right or tap on the green circle . The gauge moves and you can change the blinking settings.After changing the settings, tap the "Start test" button and check if the indicator blinks. Set the blinking method to your liking. If you want to return the gauge settings to their initial state, tap the "Reset to default" button .
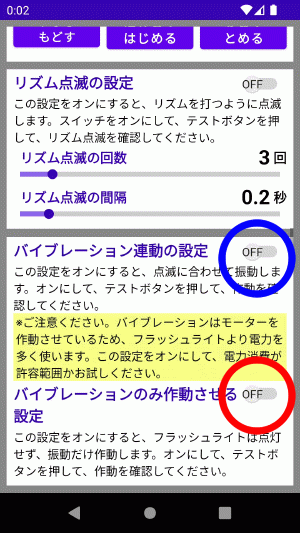
Please also try the vibration function.
Tap blue circle to turn it off. You can turn it on and off even while it is blinking. Tap the red circle to turn the switch ON , then Tap the "Begin Test" button .The flashlight does not shine, only vibration works. Tap the red circle to turn it off. You can turn it on and off even while it is blinking. This is the end of "Step 4 Test the blinking operation".Please proceed to step 5.
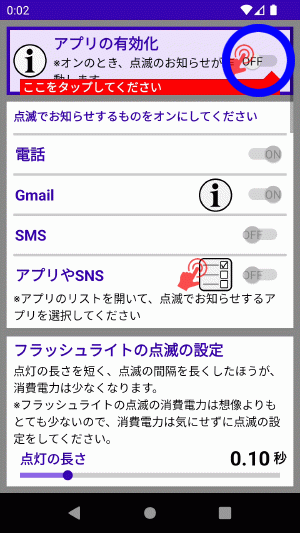
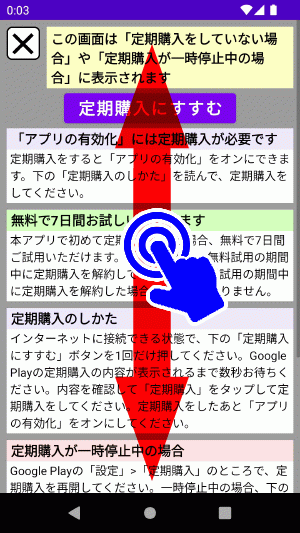
After confirming that the smartphone's flashlight blinks in the flashing operation test, activate the app.
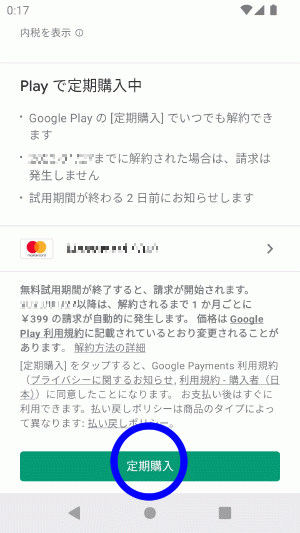
After tapping, please wait until the image below appears.
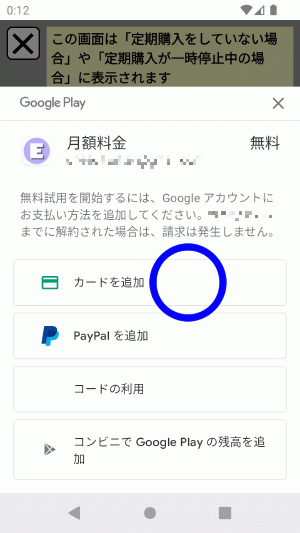
*" Google account name" and "date" are displayed differently depending on the user, so they are mosaicked in the image. Select and tap your preferred payment method. Here, we will explain when using a credit card, which is the most frequently used method. Blue circle Tap "Add card" .
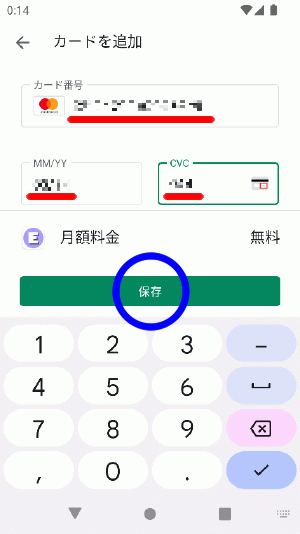
Enter "Credit card number", "Expiration date", and " Security code ( 3 digits on the back of the card ) ". *In this explanatory image, the MasterCard number is displayed because the MasterCard number has been entered. *Credit cards other than MasterCard can also be used. blue circle tap the "Save" button when you're done.
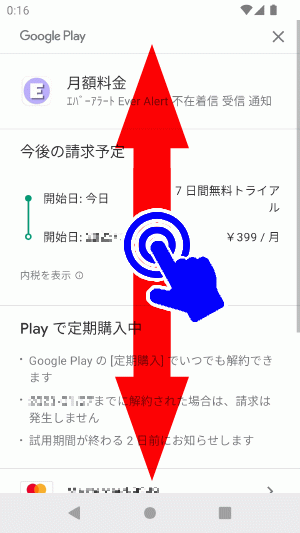
Swipe up and down to get a closer look. If you are using the app for the first time , you can try it for free for 7 days.
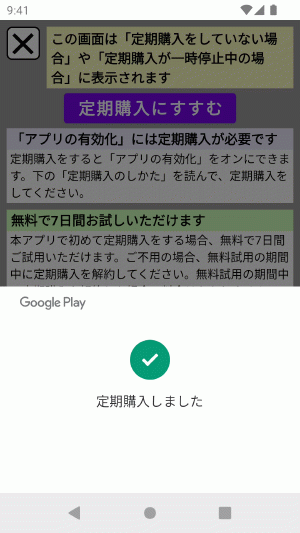
It will disappear automatically, so please wait for a few seconds. When the message "Subscription purchased" disappears, you will automatically return to the main screen of the app. *If the main screen does not appear automatically, tap the cross mark on the upper left to return to the main screen.
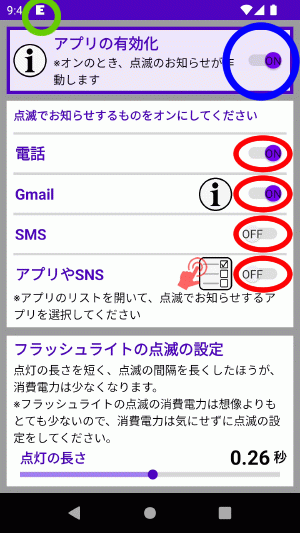
"App activation" is turned on, so you can operate the 4 switches at red circle Now When "App Activation" is turned on, the top of the screen ( status bar ) green "small E icon" is displayed in the circled area . *It may take a few seconds for the "small E icon" to appear when you turn on "App activation" for the first time.
This is the end of "Step 5 Activate the app". |


ホームページ作成とショッピングカート付きネットショップ開業サービス